Customer Information - Update allows you to add or edit a customer record. For Type select if the customer is an Organization or Individual. If the customer is an organization enter the Organization Name. If the vendor is an individual you can specify a Title and edit the First Name, Middle Name, Last Name, Salutation, and Suffix fields. There are also the following tabs: Customer Information, ACH Accounts, Phones, Emails, Addresses, Demographics, and Attachments.
This Section Includes:
|
|
Customers who are also Employees do not have the option to change the Type from Individual to Organization. This is because you can only issue Form W-2 to individuals. |
The Bill To field allows you to specify another customer to be used as a default "Bill To" when creating invoices. Click the (not set) link or the Search ![]() icon to display the Person Search window. By default the search text for the Name field searches for last names and organizations. To search for first and last names enter your search in the "lastname, firstname" format. You can also search by City and State. Select the customer you want to use as a "Bill To" and click the Select button. Alternately, click the Close link to return to the previous page without selecting a customer. To the right of the Bill To field the ID # is displayed.
icon to display the Person Search window. By default the search text for the Name field searches for last names and organizations. To search for first and last names enter your search in the "lastname, firstname" format. You can also search by City and State. Select the customer you want to use as a "Bill To" and click the Select button. Alternately, click the Close link to return to the previous page without selecting a customer. To the right of the Bill To field the ID # is displayed.
NOTE: Search for just a first name by starting your search with a comma (e.g., ", James"). Display a complete list of individuals by searching for just a comma.
|
|
The Bill To field is optional. Leave this field blank unless there is another individual responsible for paying the selected customer's charges. |
Select the default Source and Divisions (e.g., Campus) to be used as defaults when creating invoices. You can set up your divisions in Modify Preferences (More Information) and then edit division and source types in Control Table Information (More Information). Enter the customer Tax Exempt ID # if applicable.
|
|
No taxes are calculated for this customer If the Tax Exempt ID # field is used. This applies even if a Taxing Locale is selected. |
The Taxing Locale can be selected from the drop down list. You can select one or more of these as appropriate. Taxing Locales are set up in Sales Tax Information (More Information).
The Contact Name allows you to enter the contact name for this customer (e.g., Bill Smith). Check the option to Do not charge late fees if this customer is not subject to late fees. Enter any needed information about this customer in the Note field. This note shows when inquiring on invoices through View Transaction Inquiry (More Information).
The ACH Accounts tab allows you to enter or edit the ACH Direct Deposit information for a customer.
Click the ![]() Add New ACH Account icon-link to add a new account. The Add New ACH Account window appears. Enter the following information.
Add New ACH Account icon-link to add a new account. The Add New ACH Account window appears. Enter the following information.
•Account Type: Select either "Checking" or "Savings" from the drop-down list.
•Bank Routing #: Enter the bank routing number.
•Bank Account #: Enter the bank account number.
•Default: If this customer has more than one ACH account, then you should mark one of the accounts as a default account.
.png)
NOTE: A check scanner device can be used to enter the Bank Routing # and the Bank Account # if you have installed the Scanner Client executable. To install the Scanner Client executable, hover over the Information ![]() icon next to the Bank Routing # field and then click the click here link to download the executable. Refer to the Installing and configuring the Scanner Client executable section for more information.
icon next to the Bank Routing # field and then click the click here link to download the executable. Refer to the Installing and configuring the Scanner Client executable section for more information.
Click the Apply button to save the ACH account and add another ACH Account.
Click the OK button to save the ACH account.
Click the Close link to return to the ACH Accounts tab without saving your changes.
Existing Accounts:
After adding an ACH Account, you have the following options.
•Click the Edit ![]() icon to modify the ACH Account information.
icon to modify the ACH Account information.
•Click the Delete ![]() icon to remove the ACH Account from the customer record.
icon to remove the ACH Account from the customer record.
.png)
|
|
Cross Check
When you scan a check (using a Cross Check scanner) on the invoice entry page, the bank account of that check is automatically added to the ACH Account tab on the customer record. |
The Phones tab displays the phone numbers assigned to a customer and has options to modify these phone numbers.
The following options are available on the Phones tab.
•Click the ![]() link to add a new phone number.
link to add a new phone number.
•Click the Edit ![]() icon to modify an existing phone number.
icon to modify an existing phone number.
•Click the Delete ![]() icon to remove a phone number from the system.
icon to remove a phone number from the system.
•Click on the Phone Type, Phone Number, or Extension header to sort the list of phone numbers by that header.
.png)
Add or Edit a Phone Number:
The following fields are available when selecting to add or edit a phone number.
•Phone Type: Select the phone type from the drop-down list. (Phone types can be modified on the Lookups page. To navigate there, click the Applications option from the Top menu and then select Utilities -> Lookups. Also, the order of the Phone types can be modified on the Lookups page.)
•Phone Number: Enter the phone number. The phone number is automatically formatted when your cursor leaves the Phone Number field. For example, if you enter "9015551234", the number is automatically formatted to display "(901) 555-1234".
•ext.: Enter the phone number extension (optional).
•Unlisted: This check box is informational. Selecting this option does not prevent the phone number from printing on reports.
•SMS: This check box is informational.
|
|
All phone numbers must have an Area Code. If a phone number is entered without an area code (7-digits), then the default area code is added automatically. The default area code is specified on the Utilities > Organization page. To navigate there, click the Applications option from the Top menu and then select Utilities -> Organization. |
Click the ![]() button to save your changes and return to the Phones tab.
button to save your changes and return to the Phones tab.
Click the Close link to return to the Phones tab without saving your changes.
The Emails tab displays the email addresses assigned to a customer and has options to modify these email addresses.
The following options are available on the Emails tab.
•Click the ![]() link to add a new email address.
link to add a new email address.
•Click the Edit ![]() icon to modify an existing email address.
icon to modify an existing email address.
•Click the Delete ![]() icon to remove an email address from the system.
icon to remove an email address from the system.
•Hover over the Note ![]() icon to display the text stored in the Note field.
icon to display the text stored in the Note field.
(1).png)
Add or Edit an Email Address:
The following fields are available when selecting to add or edit an email address.
•Email: Enter an email address. The email address must be formatted correctly using the "@" symbol and a period.
•Note: Enter a Note (optional). Entering a note causes the Note ![]() icon to display on the Emails tab.
icon to display on the Emails tab.
•Active: Only Active Email Addresses are used for contacting the customer and for reporting purposes.
•Preferred: Only one email address can be designated as the Preferred email address. The Preferred Email address displays at the top of the List of Emails grid. It is used by the system to contact the customer and for reporting purposes.
|
|
If the Preferred email address is not marked Active, the system defaults to using the next available Active email address listed on the List of Emails grid. |
Click the ![]() button to save your changes and return to the Emails tab.
button to save your changes and return to the Emails tab.
Click the Close link to return to the Emails tab without saving your changes.
The Addresses tab displays the addresses assigned to a customer and has options to modify these addresses.
The following options are available on the Addresses tab.
•Click the ![]() link to add a new address.
link to add a new address.
•Click the Edit ![]() icon to modify an existing address.
icon to modify an existing address.
•Click the Delete ![]() icon to remove an address from the system.
icon to remove an address from the system.
•Click on the Address Type, or Address header to sort the list of addresses by that header.
(1).png)
Add or Edit an Address:
The following fields are available when selecting to add or edit an address.
•Address Type: Select the address type from the drop-down list.
•Address Line 1: Enter the first line of the address.
•Address Line 2: Enter the second line of the address (Optional).
•Postal Code: Enter the Postal Code/Zip Code.
•City: Enter the name of the City.
•State: Select the State from the drop-down list using your mouse or type the first letter of the state. (You can continue to press the first letter of the state to scroll through the states that start with that letter.)
•Country: Select the Country from the drop-down list.
•Primary: Only one address can be designated as the Primary address. The Primary address displays on grids and is used by the system to contact the customer and for reporting purposes.
|
|
The Address Types and the Country drop-down options can be modified on the Lookups page. To navigate there, click the Applications option from the Top menu and then select Utilities -> Lookups. Also, the order of the Address types and Countries can be modified on the Lookups page. |
Click the ![]() button to save your changes and return to the Addresses tab.
button to save your changes and return to the Addresses tab.
Click the Close link to return to the Addresses tab without saving your changes.
Enter the Birth Date, Social Security Number, Salutation, and Gender in the fields provided.
|
|
If the customer is an organization, the following fields display: Date Created, Federal Tax ID Number, and Salutation. |
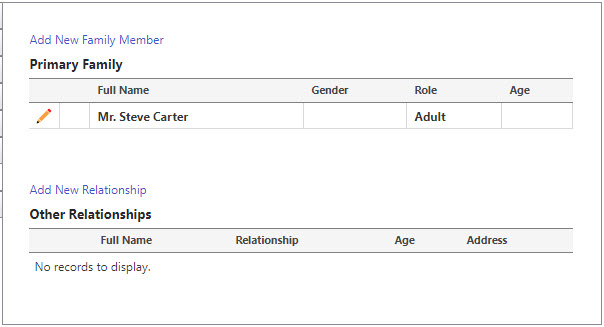
The Relationships tab is designed to associate family members together. In addition responsible people outside of the core family can also be added.
Organizations that include a daycare or school often set up the child (or student) as the customer and then link a parent (or other responsible person) as the bill to. This tab makes it easy to find the parent (or other responsible party) associated with the child care or tuition bill.
The following options are available on the Relationships tab.
•Click the ![]() link to add a new member to this family.
link to add a new member to this family.
•Click the ![]() link to add a new record as a relationship (i.e. Uncle, Grandparent, etc).
link to add a new record as a relationship (i.e. Uncle, Grandparent, etc).
Add a New Family Member:
The following fields are available when selecting to add a new family member.
•Family: Select the member by clicking the Search ![]() icon.
icon.
•Role Type: Select the role type from the drop-down list.
Add New Relationship:
The following fields are available when selecting to add a member as a relationship.
•Relationship: Select the member by clicking the Search ![]() icon.
icon.
•Relationship Type: Select the relationship type from the drop-down list.
|
|
The Relationship Type drop-down options must be established on the Relationship page under Control Table Information in Accounts Receivable. To navigate there, click the Modify option from the Top menu and then select Control Table Information -> Relationships. You establish the Inverse Relationship here as well (if needed).
The inverse relationship is automatically added to the other person. For example if you add an Aunt/Uncle type to the Other Relationships grid, a Niece/Nephew type is added to that other person. If you leave the inverse blank, the connection is not shown on the other record. |
The Attachments tab allows you to attach files accessible from your device or to scan image files using the Scanner.Client program. See the Attachments Help Page for detailed information regarding the attachments feature.
When finished click the Update button to save your changes and return to the Customer Information page, the Reset link to undo all changes since the last time the customer was updated, or the Cancel link to discard all changes and return to the Customer Information page.